How I earn Bitcoin for free!
17 February 2018
Bitcoin is one of the biggest players in the exciting new world of cryptocurrency. But are you still unsure in investing in some? Well, I have a nice solution to obtaining Bitcoin without investing.
I have been using the website Freebitco.in for a little over a year now. All you need to do is sign up for an account and tick a Google reCAPTCHA box every hour. Of course, it’s not a free whole Bitcoin (At the time of writing 1 BTC = over 9900 USD).
What is the catch? Well, the reason why they’re giving you small amounts of Bitcoin every hour is due to the fact they also run a little HI-LO gambling game. I don’t agree with gambling games, so I am content with earning the small amounts of Bitcoin every hour.
Click the banner below to get started and earning free bitcoin!

Hope it helps you to get into the world of Bitcoin! Enjoy!
NOTE: The links included to sign up to freebitco.in are referral links, it means I get some perks for each new user who signs up via my link. If you’ve found this blog post helpful then please share it with your friends, family and on social media.
Speed up a slow Apple Mac
20 January 2018
An old 2009 Mac Minis are very sluggish these days, but it does the job (eventually). However, there are a few tips and tricks that I’ve picked up that can help increase the performance of your aging MacBook, Mac Mini, iMac or MacBook Air.
Upgrade the RAM
The most common application used on your Mac is usually your web browser such as Safari, Mozilla Firefox or Google Chrome. These need a lot of memory to temporarily store data quickly such as contents of each tab open. If you’re like me, you tend to have lots of tabs open at a time, this rapidly uses up your available memory.
Adding a new stick of RAM will help greatly if you’re a heavy internet user. The problem is, there are many different setups therefore different form factors of memory. The best way to ensure you’re getting the correct RAM module for your Mac is to use a service such as Cruicial’s system scanner.
Not only will it provide you details about your computer’s specification but also advise you on the highest amount of memory your computer supports. If possible upgrade to a memory limit of 8GB or above.
Replace the hard drive with a Solid State Drive

Traditional hard drives are still being packed in with modern laptops and desktops. This is usually to keep the overall cost down when you buy a new computer. However, they are one of the biggest bottlenecks to your computer’s performance. It has an effect on your day-to-day computing tasks such as starting an application or waiting for a game to load.
There are much faster solutions to storing your files and data, using something called a “solid state drive”. Personally, I opt for the Samsung Evo 850 solid state drives as they have some of the best write/read speeds and have been running in my machines without any flaws for years.
There are cheaper alternatives such as Cruicial’s SSD range, which might even offer different read/write speeds. Worried about storage space? While there are larger capacity solid state drives, they can become quite expensive. There is an alternative to solid-state drives which also offer large capacity, but aren’t as slow as a traditional mechanical hard drive. These are called Hybrid Drives (SSHDs).

While they don’t provide the high performance read/write speed, they do have a small solid-state drive built into them. It’s usually designed to cache frequently used bits of data so it can be quickly retrieved when needed.
Tame the animations
While hardware upgrades are going to provide the best performance boosts for your Mac, there are a few software optimisations to make your Mac feel faster. For example, turning off MacOS’ animations means that it saves not just graphical processing power but also saves you a few milliseconds each time when performing common tasks such as opening application windows from the dock.
Disable dock animations
While the ‘Genie’ effect when opening/closing application windows to the dock look cool when you first get your Mac, it’s slowing your workflow down each time you do it by a few milliseconds, which all adds up throughout the day. To change this to a quicker ‘Scale’ effect simply use these following steps:
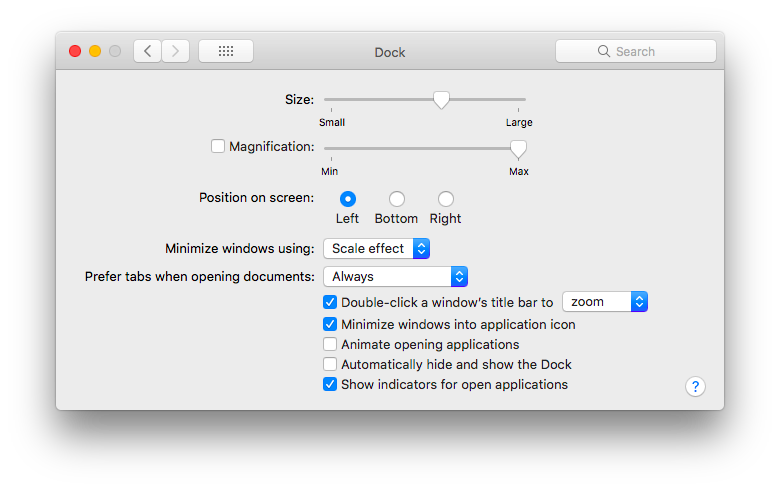
- Open the ‘Settings’ application
- Click the ‘Dock’ option
- Change the dropdown option for ‘Minimize windows using:’ from the ‘Genie effect’ to the ‘Scale effect’.
Tame the rest of the visual effects
There are a few hidden options that also make macOS feel much snappier. Simply follow the below steps to achieve this:
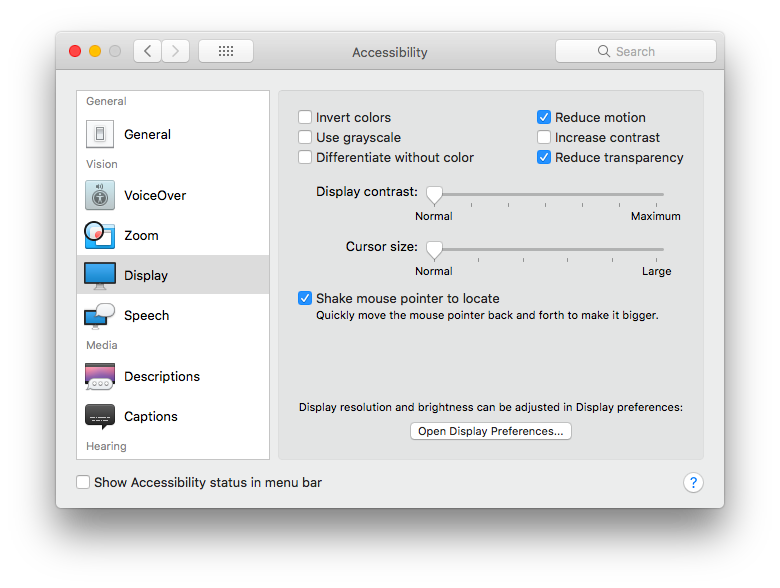
- Open the Settings application again
- Press the ‘Accessibility’ icon
- In the left pane, select ‘Display’
- Ensure the ‘Reduce motion’ and ‘Reduce transparency’ are both checked.
Feels much faster, right?
Disable spotlight
If you don’t have the time or funds to replace Mac’s slow traditional hard drive then disabling Spotlight indexing will help your Mac from grinding to a holt. The downside to this is that you can’t quickly search for files, such as documents, using the search icon on the top right of your Mac. If you don’t use this feature, then you can disable Spotlight Indexing as follows:
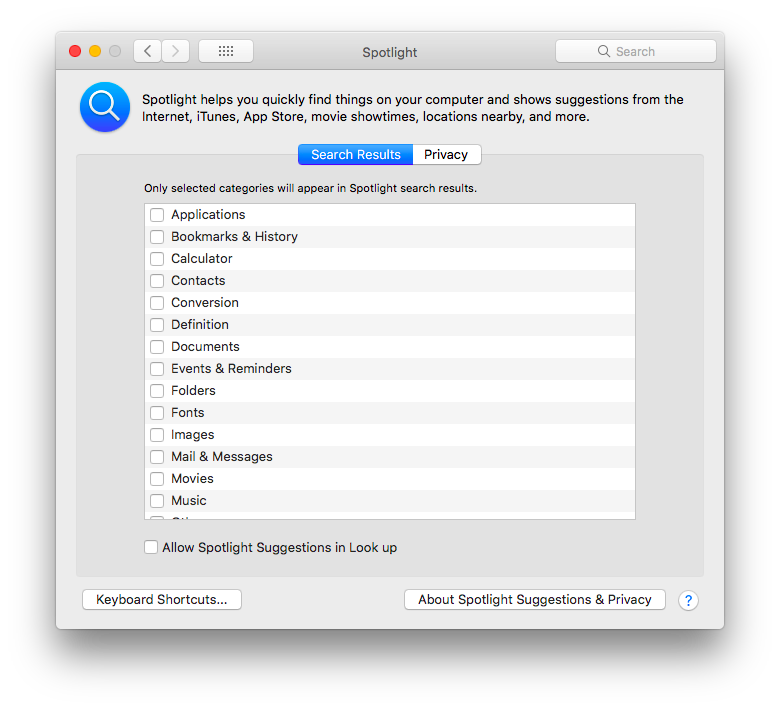
- Open the Settings application
- Click the ‘Spotlight’ icon
- Ensure everything is unchecked like in the image above.
Bonus: Increase iOS Simulator performance
Here is a quick tip for other Web Developers who are using the iOS simulator to test on various iOS setups. Simply scaling the display of the simulated iOS device would mean that there are fewer pixels to render. To achieve this follow the below steps:
- In the iOS simulator window select the ‘Window’ menu on the top bar
- Select the ‘Scale’ menu item and then try any option that is ‘50%’ or smaller. This will mean that your Mac will have to render at least half of the detail in the iOS frame.
Hope this helps with all the various ways to get as much of a performance out of your new or old Mac! Make sure you tweet me on Twitter if this has helped you.
Note: This blog post contains affiliate Amazon links. This means that I’ll get a percentage of each sale made by clicking my links to products on Amazon. This, in turn, helps me being able to invest more time in writing more blog posts just like this one. Thank you.
Earn Bitcoin just by playing games
10 June 2016

Ever wanted to earn some Bitcoin but not too sure where to start? Here is a nice, easy stepping stone into the digital currency world. Bitjoy offer a service for game developers to integrate their platform into mobile games.
As a gamer, all you need to do is to sign up, download a Bitjoy-enabled game and login before you start playing.
Currently there is Bitcoin froggy, a Crossy Road clone, for both the App Store or Google Play as well as additional games for Android phones and tablets including Bitcoin Pixel Runner which is a Canabalt/Endless runner game and Bitcoin 80s Shooter which is like a classic arcade shoot-em up!
Use my referral link to get signed up to Bitjoy and for you to start earning Bitcoin!
Simply sign up, confirm your email address, download a game, sign in and PLAY!
HTML5 Game Development Gulp Workflow
24 August 2015
Last week, my friend Jordan and I have started work on a game for the js13kgames competition. For those who don’t know what the rules of the competition involve, you have an entire month to create a game in a 13kb zip archive.
Luckily, as it’s targeting HTML5 game developers to use JavaScript in order to create their games, this means that all the technology that goes into creating other web-based projects, such as your everyday websites, can be used into an HTML5 game development workflow.
Introducing… Gulp!
Gulp is a task runner that is designed to automate common tasks within a web development process, whether it’s for a traditional website project or can even be used for HTML5 game development. Written in JavaScript, Gulp allows developers to create tasks for automating processes such as compressing images, compiling stylesheet preprocessors such as LESS or SASS and so much more.
This blog post will cover how to install Gulp and use it within your HTML5 Game Development workflow.
##Requirements
- OSX or Linux
- Nodejs + NPM
Installing NodeJS + NPM
Within OSX
brew install nodejs npm
Within Ubuntu, Debian, Elementary OS, etc
sudo apt-get install nodejs npm
Within Red Hat, Fedora, CentOS, etc
sudo yum install nodejs npm
##Installing Gulp Please refer to Gulp’s getting started guide here.
##Gulp Tasks There are literally thousands upon thousands of gulp related tasks to install. However, I have hand selected a few gulp tasks that will be used frequently in a HTML5 game development with a brief description of what action each gulp task performs:
- gulp-zip: Compresses files into a zip folder.
- gulp-concat: Combines (JS) files together, smaller footprint size and fewer HTTP requests = quicker loading of the game.
- gulp-uglify: Minifies JavaScript code to be as small as possible in file size.
- gulp-watch: Keeps a check for file changes
You can install the list of gulp tasks above by using the following command below:
npm install gulp gulp-zip gulp-watch gulp-jshint gulp-concat gulp-uglify gulp-image-optimization gulp-minify-html gulp-rename run-sequence
##Gulpfile
In order to use these tasks and specify the different actions and files to target we need to create gulpfile.js in the base directory for the game. Once you have installed the gulp tasks above, then add the following lines of code to your freshly created gulpfile and save:
//All the Gulp tasks and dependencies
var gulp = require('gulp'),
zip = require('gulp-zip'),
watch = require('gulp-watch'),
jshint = require('gulp-jshint'),
gp_concat = require('gulp-concat'),
gp_uglify = require('gulp-uglify'),
imageop = require('gulp-image-optimization'),
minifyHTML = require('gulp-minify-html'),
rename = require('gulp-rename'),
runSequence = require('run-sequence');

//All your paths for JS, HTML and Image files
var zip_files = ['game.js', 'index.html'], //Files to be added to the zip folder use "<directory goes here>/*" for all files inside the directory
    js_files = ['js/main.js', 'scenes/*'], //All your JS files to be combined and minified
    img_files = ['assets/*.png','assets/*.jpg','src/**/*.gif','assets/*.jpeg'];

//Zip up the JS/HTML required for the game
gulp.task('zip', function () {
    return gulp.src(zip_files, {base: "."})
        .pipe(zip('release.zip'))
        .pipe(gulp.dest('build'));
});


//Run this task once the game is ready to ship!
gulp.task('publish', function() {
    runSequence('build-js', 'build-html', 'zip');
});

//Compress Images
gulp.task('images', function(cb) {
    gulp.src(img_files).pipe(imageop({
        optimizationLevel: 5,
        progressive: true,
        interlaced: true
    })).pipe(gulp.dest('assets')).on('end', cb).on('error', cb);
});

//Minify the HTML
gulp.task('build-html', function() {
  return gulp.src('./index.unmin.html')
    .pipe(minifyHTML())
    .pipe(rename('index.html'))
    .pipe(gulp.dest('./'));
});

//Build the JS and minify
gulp.task('build-js', function() {
    return gulp.src(js_files)
        .pipe(jshint())
        .pipe(jshint.reporter('default')) //Report on errors found by jshint
        .pipe(gp_uglify()) //Minify JS
        .pipe(gp_concat('game.js')) //Merge all the JS files into one game.js file
        .pipe(gulp.dest('./'));
});

//Build the JS without minifying
gulp.task('build-dev', function() {
    return gulp.src(js_files)
        .pipe(jshint())
        .pipe(jshint.reporter('default'))
        .pipe(gp_concat('game.js'))
        .pipe(gulp.dest('./'));
});

//Watch for any JS or HTML file changes
gulp.task('watch', function () {
    watch(js_files, function () {
        runSequence('build-dev');
    });

    watch('./index.unmin.html', function () {
        runSequence('build-html');
    });
});
##Commands You will now be able to run the following commands in order to achieve different tasks:
gulp zip - Adds your minified JS file and index.html to a zip file, great for quick distribution of your game
gulp publish - The command you run when you are ready to release your game. It will run the build commands for your JS and HTML, one last time before zipping them up.
gulp images - Compresses images for a lower file size
gulp build-html - minifies your HTML file(s)
gulp build-js - Checks your JS for errors, concatenates all your JS files down to one file before minifying the JavaScript code.
gulp build-dev - Checks your JS for errors and concatenates all your JavaScript files down to one file but doesn’t minify (Easier for debugging!!)
gulp watch - Keeps a close eye on your specific JS files / folders and will run uglify whenever a change has been made, just like the gulp build command.
*Update: * I have made a GitHub repository for other HTML5 Game Developers to suggest tasks to be added to the ‘gulpfile.js’ by either opening an ‘Issue’ with your suggestion, or by creating a pull request.
Top Laravel 5 Features
8 February 2015

Over the weekend, I started a brand new project using Laravel, the MVC-framework for PHP based projects. For those who haven’t checked it out already, last week on the 4th of February, they have finally released the fifth iteration of Laravel. Just like with the release of Laravel 4, it brought some big new features and some architecture changes to your Laravel based project, therefore a few days of maintenance may be required to get your project using the Laravel 5 codebase. Read on for a rundown of a few new changes and features which I have found to be extremely useful.
New project structure
The first thing you’ll probably notice with a fresh install of Laravel 5 is that the project structure is slightly different. This is because there is now a /resource/ folder which is new to Laravel 5 which keeps all of your assets such as .less source files, language strings, and views separate to your /app/ folder. Previously, I used to keep views separate in Laravel 4 using workbench packages but the workbench functionality is now been deprecated in Laravel 5.
Laravel Elixir
Probably my favourite service to arrive in Laravel 5 is the ‘Laravel Elixir’ which is used to compile all your .less, .sass or CoffeeScripts. As well as combining the output stylesheets. It has other useful features such as allowing you to trigger unit tests and much more!
Starter Boilerplate
When I first ran the Laravel Installer, I started to look at the new project directory structure. First I discovered the traditional ‘Welcome View’ from previous Laravel releases, but also Bootstrap-templated views for showing off Laravel’s user authentication functionality. Personally, I find this not just a great way to show new Laravel users how the framework works, but also a great starting point for even experienced Laravel users.
File Generation
The Artisan command has a set of new functionality which is useful for quickly creating new classes and controllers. Not only does it feature new file generation commands, you can see a full list of the commands on offer using the following artisan command below:
php artisan listApplication Namespace
A small but useful change in Laravel 5 is that you now have the ability to give your Application a namespace! Simply run the following artisan command from your terminal while in your project directory:
php artisan app:name <APPLICATION NAME GOES HERE>So there is my top 5 features from Laravel 5. Agree? Disagree? Make sure you send me a message on Twitter to tell me what you think of the Laravel 5 release.
- Prev
- 1(current)
- 2
- 3
- Next